If you want to set up a personal blog (like this one), GitHub’s GitHub Pages platform will host it for you for free. This post shows the steps I went through to set up the blog, and set it up so people can access this site from my custom domain (which costs me $12/year through Google Domains). It took about 45 minutes total to get things set up, but if you follow the steps below, it shouldn’t take you more than 10 minutes to get a free blog (using the Beautiful Jekyll template) up and running.
Setting up this site
In late 2018, a problem motivated me to explore off-the-shelf options for an issue tracking application but none of the candidates I found satisfied the core requirements I had identified for the problem. I worked through the official tutorial for python’s django web framework and was sufficiently impressed that I decided to learn more. While working through the book “Test-Driven Developmen with Python”, I bought (leased?) the “matttriano.org” domain (through Google Domains), set up my first AWS server instance, and successfully fumbled my way through DNS configuration options. When I finished with the book and my subsequent experiments, I shut down the AWS server instance, developed my django app locally, and squirrelled the “matttriano.org” domain away in one of my many toolboxes to gather dust.
Last year, while working on learning docker (and figuring out if it’a a sensible tool to use in my data science workflows), I came across a blog post titled Reproducible data science with Docker and Luigi on the personal blog of a data scientist named Daniel Martin-Alarcon. I was very impressed with the post; not only was the technical documentation of tools extremely helpful and the analysis insightful, but the presentation was extremely clean and elegant. After reading through the post, I noticed the line “Theme by beautiful-jekyll” in the footer, which took me to the Beautiful Jekyll page, which had the same aesthetic and indicated the site could be set up for free on GitHub Pages and available to the world in minutes. With my curiosity piqued, I reached into a toolbox for my dusty old domain and set up this site.
The Steps
-
Have a GitHub Account
-
Fork the beautiful-jekyll repo
-
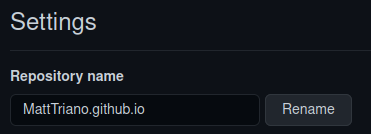
Rename the project name of your forked repo to
<your_GitHub_user_name>.github.io:-
(from your fork’s repo page) Go to the Settings menu.

-
Change the name in the Repository Name field, then click the Rename button.
-
-
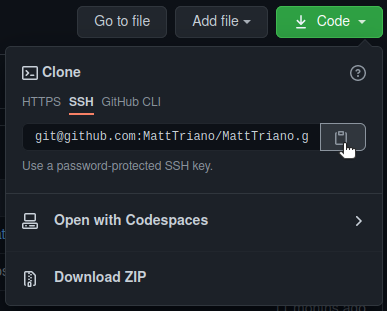
Clone your repo to your local machine:
- (from your fork’s repo page) Click the Code dropdown
-
Copy the HTTPS URL or SSH URL for your repo (if you’ve set up SSH, I recommend using the SSH URL)
-
Open up a terminal, navigate to the directory you want to put the project, and enter the command
... $ git clone <paste the URL you just copied in the last substep>
-
(In a text editor) Edit the _config.yml file
This file is in the top level directory of the repo you just cloned. For me, that directory is in location
~/projects/MattTriano.github.io.-
Read through the file and replace the filler author name, site title, links, etc with your name, site title, links, etc.
-
git add,commit, andpushyour updated _config.yml file up to your (remote) repo on GitHub
Assuming the formatting of you _config.yml file is valid, you should be able to see your site at
https://<yourusername>.github.iowithin a few minutes. If you’re fine with that, then you can stop here. -
-
If you want to use a custom domain for your site:
- (from your fork’s repo page) Go to the Settings menu, then go to the Pages settings

- In the Custom domain field, enter your custom domain name and click Save

-
Configure the DNS (Domain Name System) to route requests to your domain to the right place
-
Go to the domain registrar you bought your domain from (domains.google.com in this example)
-
Go to the DNS configuration page for your domain
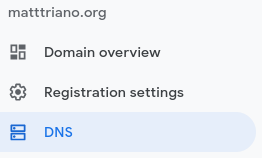
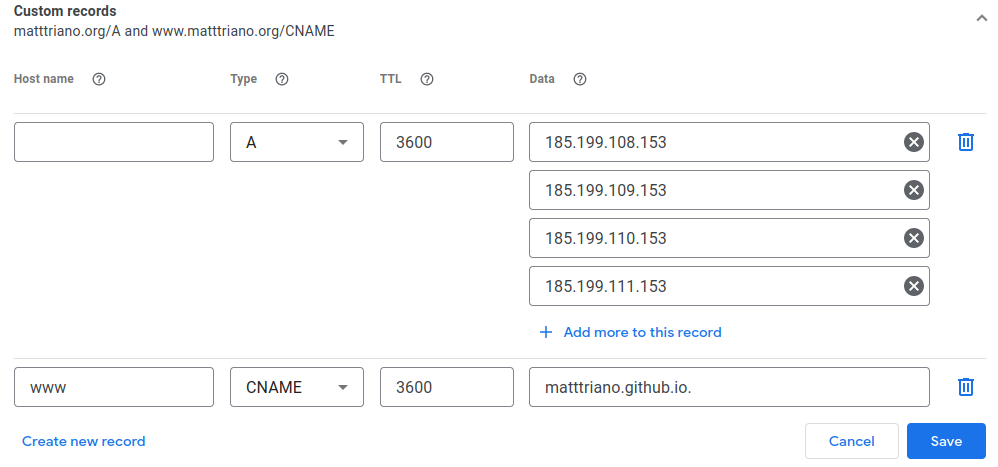
- Add custom records (Manage custom records on google)
You’ll add these 4 IP addresses that point to GitHub’s servers and are the same for everyone (leave Host name blank and choos A for the record Type)
-
185.199.108.153
-
185.199.109.153
-
185.199.110.153
-
185.199.111.153
and configure the CNAME (Canonical Name) for www subdomain to be
.github.io. Then click Save:
-
After this, your domain registrar has to push these changes out to all of the other DNS services, so it might take 5 to 30 minutes for requests to your custom domain to work (many things say it can take up to 24 hours, but I haven’t ever observed a delay more than 30 minutes). Also, you might have to prompt GitHub Pages (through the Settings > Pages interface) to check the domain again once it’s set up. But when that check works, your site should be live.